How to see where the sun will be at a location, from a photo
You've found a good street, and the next question is when the light will be right. Is the façade lit in the morning or the evening? Will the sun be in shot at the time the crew can get there? In December, will it clear the building opposite at all?
The usual answer is a sun-position app, used on the spot. This guide shows how to get the same answers back at your desk, from a photo you already took.
What a photo needs to know
The sun's position depends on only three things: where you are, the date and time, and which way you're looking. A photo from a phone usually records all three:
- Where: the GPS position, in the photo's EXIF data.
- When: the date and time it was taken, with the time zone on recent phones.
- Which way: the compass direction the camera faced. iPhones also record how the phone was tilted and rolled.
From those, the sun's height and direction at any moment can be worked out with plain astronomy. No internet is needed.
The usual tools
Sun calculators on a map, such as SunCalc.org, show the sun's direction at a point you pick, at any date and time. They're free and good for a first look, but you have to find the spot on the map and imagine the view yourself.
Augmented-reality apps on your phone, such as Sun Seeker or PhotoPills, draw the sun's path over the live camera view. They're the most direct way to see it, but you have to be standing there.
From a photo, on your PC: Location Sorter
Location Sorter reads the position, time and direction from your photos and works out the sun for that exact frame. Open a folder of shots, then open any photo full size.
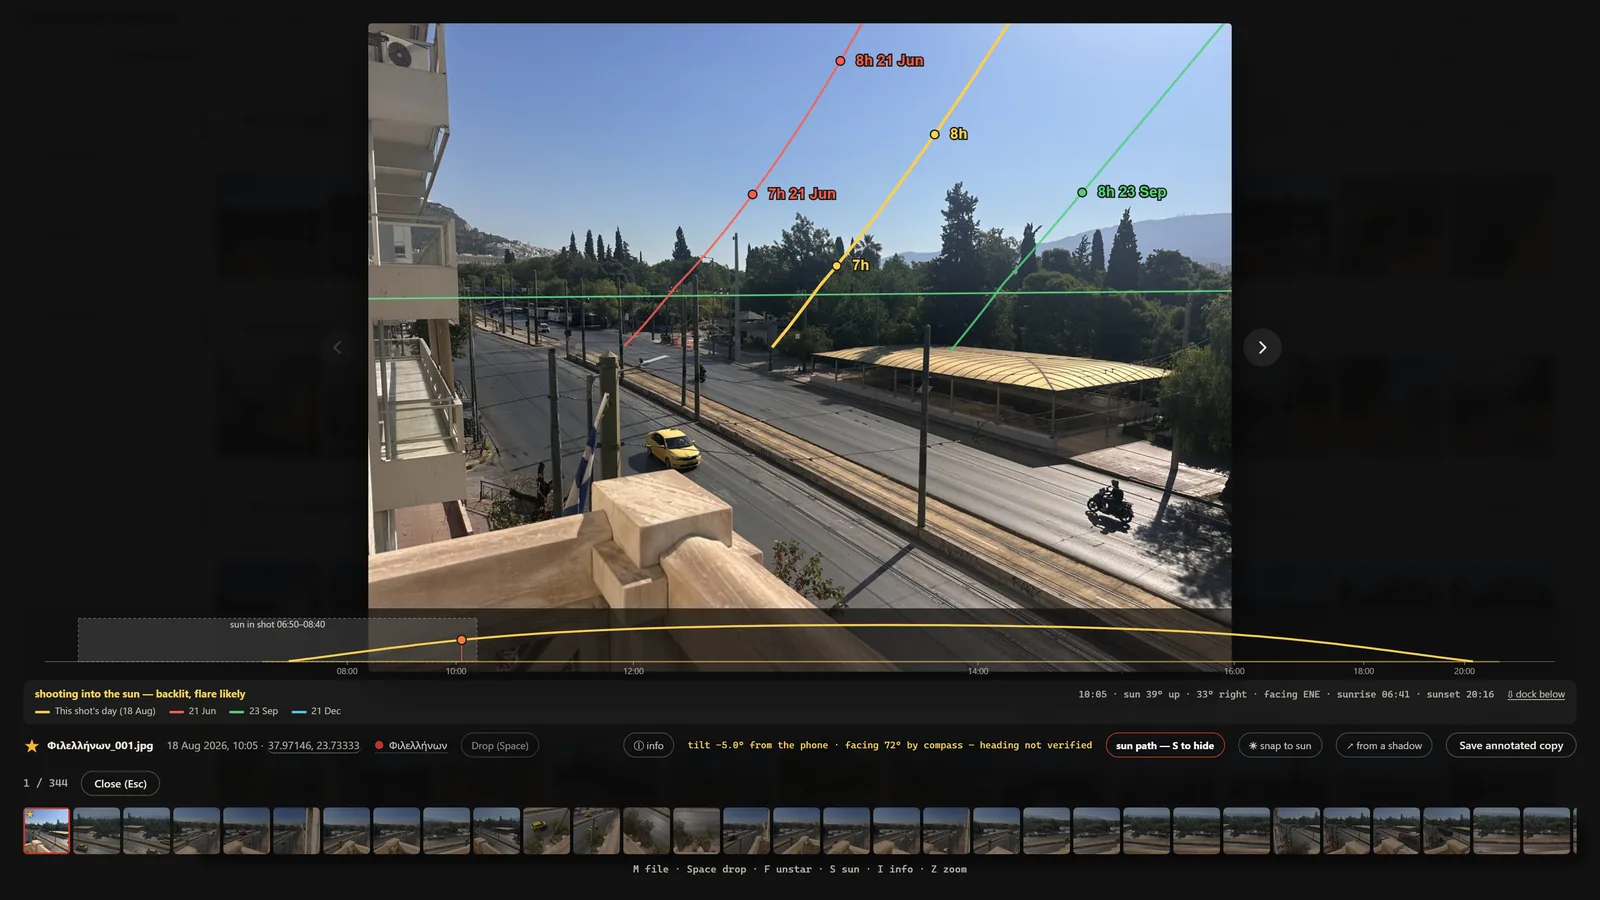
One line under the photo says what the light is doing in that frame: "shooting into the sun, backlit, flare likely", "golden hour", "sun behind the camera, evenly lit". It also gives the sun's height and compass bearing, and sunrise and sunset for that day.
Hover that line and the sun's track for the whole day appears: its arc from sunrise to sunset, the moment the shot was taken, and the hours the sun is in shot for this framing, for example sun in shot 06:50–10:20. That one line answers "when can we shoot this into the light?".
Press S and the sun's path is drawn into the photo itself: the arc for the day the photo was taken, plus the summer and winter solstices and the equinox. The two solstice arcs show the highest and lowest the sun gets all year, so you can see at a glance whether it ever clears that roof.
Getting the lines in the right place
On iPhone photos the tilt and roll are the phone's own reading, so the lines land where the sun really is: within about two degrees in testing against the real sun.
The part that can be off is the compass. A phone's compass is easily pulled off by a car, a metal railing or a steel-framed building. If the sun itself, or a clear shadow on level ground, is in the frame, click it: the heading is then worked out exactly from the sun. A note beside the controls tells you whether the heading has been checked this way.
On a camera that records no tilt, drag the photo until the horizon sits where it really is.
When it looks right, Save annotated copy writes a full-resolution copy with the sun's paths drawn in, ready to send to a director or a DP. The original photo is never changed.
Tips
- Take one frame looking straight at the subject at every place. It's the frame the sun's path is most useful on.
- Get the sun or a long shadow in at least one frame when you can. It turns a rough compass reading into an exact one.
- Check the solstice arcs for long productions. A street that's sunny in June can be in shade all day in December.
Location Sorter does all of this on your PC, with no account and no upload. It's free to try for 7 days from the Microsoft Store, then €24.99, once.